The Rule of Thirds: How to Frame Your Videos
- Chris Weiher

- May 19
- 4 min read

You don't need better lighting. You don't need a more expensive phone or camera. One of the fastest ways to make your videos look better is something most people don't think about. It's where you place yourself in the frame. The difference between a video that feels professional and one that feels slightly off without the viewer knowing why is the framing. Check out my original post here.
Start with the Rule of Thirds
The rule of thirds is the foundational principle in photography and cinematography that translates into video content. The idea is pretty simple. Divide your frame into a grid of nine equal sections using horizontal lines and two vertical lines. The most visually compelling placement for your subject is at or near one of the four points where those lines connect. For a medium shot, place your subject roughly two thirds of the way across the frame.
Check my original LinkedIn post here.
Camera Height Matters More Than People Realize
Beyond horizontal placement, the vertical angle of your camera has a significant impact on how you come across on screen. Eye level or slightly above eye level is almost always the most flattering position for a talking head video. A camera placed too low forces the viewer to look up at you, which creates an unflattering angle and tends to read as unprofessional, even if the content is strong.
This is one of the most common framing mistakes seen in LinkedIn videos, and it's entirely fixable without any additional equipment.
What the Best Cinematographers Already Know
Great framing is not a modern invention. It has been the standard in film and television for decades.
Take a look at almost any well shot scene from a major film or TV series and you will find the rule of thirds at work. A study of Oscar winning cinematography found that over 80% of key subject placements in award winning films follow the rule of thirds or the related golden ratio principle. Directors of photography use these compositions not because they are rigid rules, but because they work consistently across cultures and contexts.
Even in portrait photography, where centered close ups can be striking, the most compelling images tend to use selective focus, strong expression, and deliberate framing to guide the viewer's eye. The framing is never accidental.
Real-World Masterclasses in Framing
To see the rule of thirds in action, we can look at three iconic examples across different mediums. Each of these uses intentional placement to guide your eye exactly where the creator wants it to go.
1. Classic Cinema: The Crop Duster Scene in North by Northwest (1959)
In this legendary sequence, Director Alfred Hitchcock and Cinematographer Robert Burks use the rule of thirds to create a sense of overwhelming isolation. By placing the horizon line on the lower horizontal third, they leave the top two-thirds of the frame as empty, oppressive sky. Cary Grant is rarely centered; he is positioned on a vertical third line, creating "lead room" that makes the audience scan the vast, empty distance for the approaching threat.

2. Iconic Portraiture: Girl with a Pearl Earring by Johannes Vermeer
Vermeer’s masterpiece is a perfect study of how to frame a face. Rather than centering the subject, he aligns her face along a vertical third line. Most importantly, the subject’s eyes—the focal point of any portrait—land near the upper horizontal third. This off-center placement gives the painting a sense of "life" and movement, making it feel as though the subject has just turned to look at you.

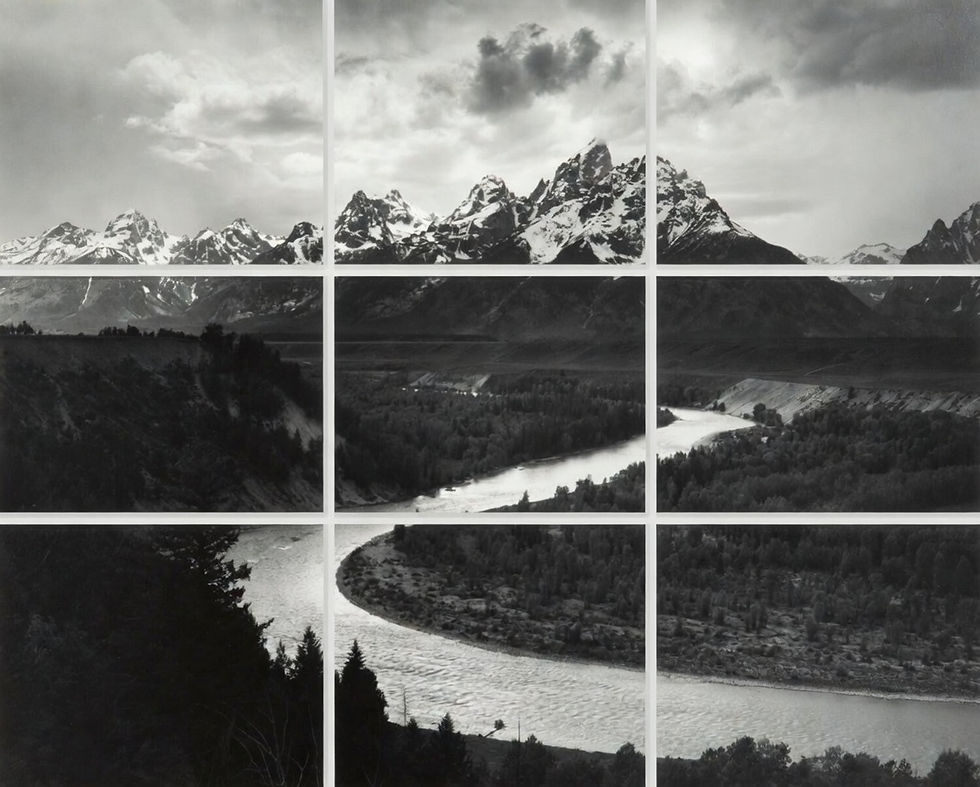
3. Landscape Photography: The Tetons and the Snake River by Ansel Adams
Ansel Adams redefined landscape photography by avoiding "split" compositions. In this famous shot, he does not place the horizon in the dead center. Instead, he positions the mountain peaks near the top horizontal third and allows the Snake River to wind along the right vertical third. This creates a geometric path that leads the viewer’s eye through the entire frame, providing a sense of immense depth and scale.
Common Mistakes and How to Fix Them
Too much headroom: If there is a large gap between the top of your head and the top of the frame, raise your camera or reposition yourself upward in the shot.
Bottom heavy placement: If your face is sitting in the lower half of the frame, you are losing the visual real estate that makes the composition interesting. Adjust until your eyes land near the upper third line.
Centered in a medium shot: Centering works well for close ups, especially when paired with a clean or blurred background. In a medium shot, it tends to feel flat. Move yourself to one side and notice the difference.
Camera too low: If you are shooting on a laptop or webcam, prop it up. Even a few inches can change the entire feel of the shot.
The Bigger Point
Most people who want to start making videos are waiting until everything is perfect before they hit record. But framing is not about perfection. It is about making intentional choices that work for you rather than against you.
You do not need a cinematographer. You just need to understand a few basic principles and apply them consistently. Once you start seeing good and bad framing, you cannot unsee it, and that awareness alone will make every video you record look more considered and professional.


Comments